


Project Sheet
Spiral Your Creativity with Quilling
Impress your friends and family with beautifully intricate paper designs, all formed through simple repetition.
- Difficulty Level: Beginner/Intermediate
- Completion Time: 10 hours
Watch a video overview:
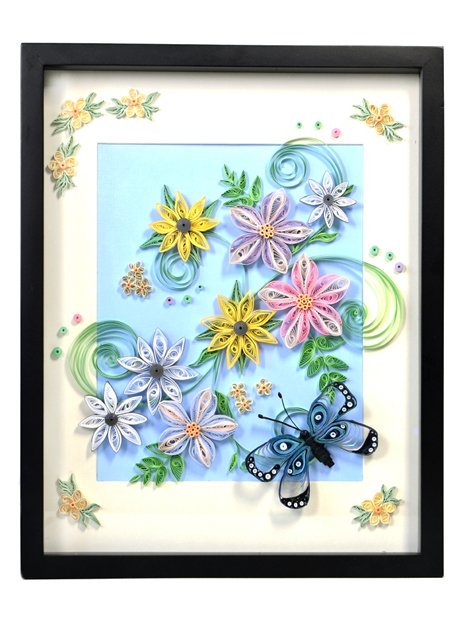 Quilling uses thin strips of paper that are rolled and shaped into gorgeous dimensional works of art. This art form offers the flexibility to scale it up or keep it simple. Embellish greeting cards, collages, and other crafts or form beautiful standalone pieces. The repetitive nature of quilling becomes relaxing and lends itself to harmony within the work.
What you'll need
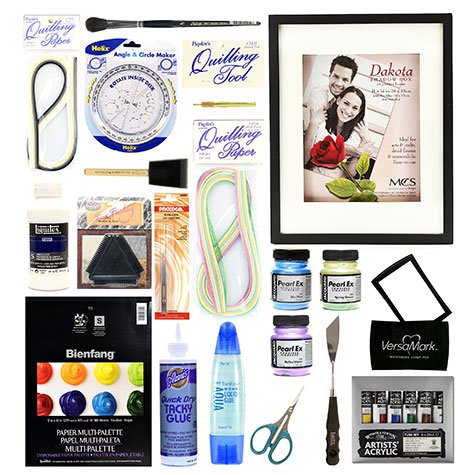 The supply list below features the basic quilling tools as well as a few optional items to enhance your creation. Our tutorial includes a shadow box frame for protection and presentation and Pearl Ex Pigments to add shimmering flair.
- Slotted Quilling Tool
- Quilling Paper Strips (2 packages Pastel & 1 package Shades of Black and White)
- Slide Lock Tweezers
- Mono Aqua Liquid Glue
- Quick Dry Tacky Glue
- Craft Detail Scissors
- Angle and Circle Maker
- Acrylic Gesso
- 2 inch Polyfoam Brush
- Liquitex Palette Knife(small 3)
- Professional Acrylic Colour Introductory Set
- Bienfang Disposable Paper Palette (9 in. x 12 in.)
- MCS Dakota Shadow Box (11 in. x 14 in. black with 8 in. x 10 in. mat opening)
- Faux Finishing Comb
- VersaMark Watermark Stamp Pad
- Pearl Ex Pigments (sky blue, reflex violet, and spring green)
- Mop Brush (1/2 inch)
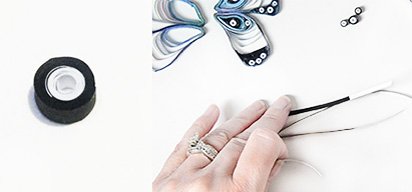
1. Prep the Frame
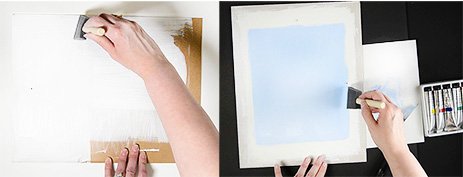
- Apply 3 to 4 thin, smooth coats of gesso to the frame’s backing board. Allow approximately 15 minutes of drying time between each coat.
- Temporarily place the mat onto the backing board and very lightly mark the inner corners of the mat.
- Use these marks as a guide to ensure the visible area receives ample paint.
- With the mat to the side, mix and apply an acrylic color of your choice to create a contrasting background from the off-white mat.
2. Quilling Basics
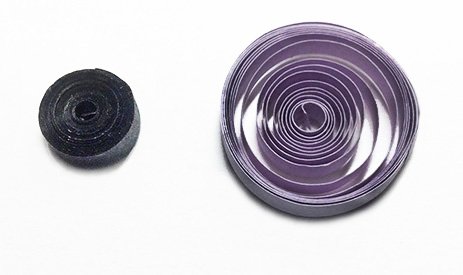 Tight coil:
- Place the end of the quilling strip into the slotted quilling tool, and begin to rotate the tool.
- Allow the paper to glide between your fingers as it forms a tight coil.
- Remove the coil from the tip of the tool while holding the end of the coil to prevent unraveling.
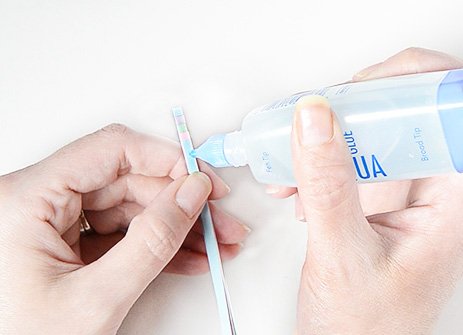
- Apply a small drop of the Tombow Mono Aqua Liquid Glue to the end to secure the tight coil.
Loose Coil:
- Start by rolling a tight coil but do not add glue.
- Allow the coil to partially uncoil within your fingertips or by placing it inside the Circle Maker to obtain a more consistent size.
- When the desired size is achieved, add a drop of Tombow glue to the edge of the strip.
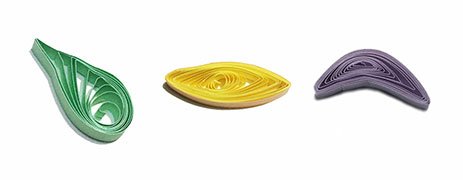 Teardrop:
- Pinch one end of a loose coil to a single point.
Marquise:
- Place the loose coil in both hands, and pinch both sides at the same time to create a point on each end.
Crescent:
- Place the loose coil in both hands, and pinch both sides while pressing upward with thumbs creating two points with a curved middle.
 Wrap petals:
- Add strength and contrast by wrapping the quilled shapes with another strip of paper.
- Apply a small amount of glue on the outer edges of the shape or group of shapes and continue following the outer form.
- When approaching sharp turns or bends, pinch the paper to create a more fitted outline. When the rotation is complete, cut the strip so that it overlaps slightly.
- Apply a small drop of glue to secure the end in place.
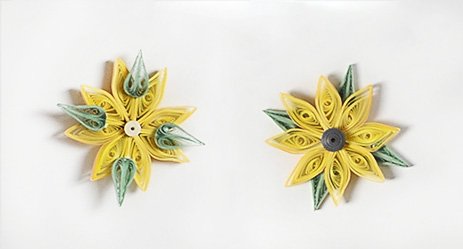
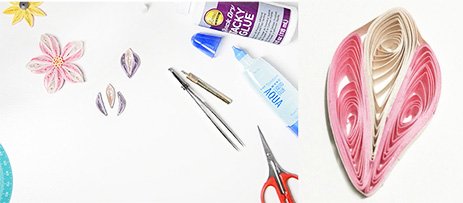
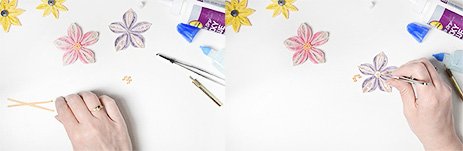
3. Flower Power
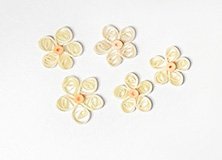
- Create 5 teardrop petals and 1 tight coil for the center. For our example, we cut strips into ¼ sections (petals) and ⅛ sections (centers) to make several smaller flowers.
- Either measure or fold the strips to cut the proportional divisions.
- Consider dividing strips for any of the flower types to produce a variety of sizes as desired.
4. Flower 2
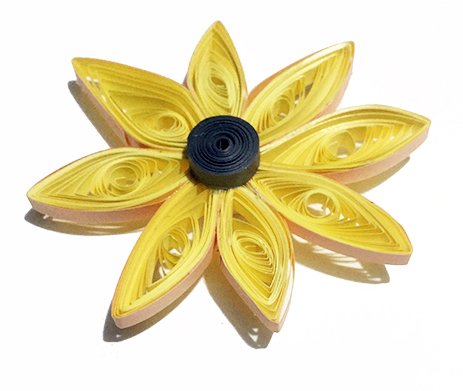
- Create 8 marquise petals and wrap each petal.
- Make 2 tight coils (1 for the floral center and 1 for under the flower).
- Create 8 teardrop shapes for 4 leaves.
- Glue 2 teardrops together to create a leaf and wrap it to reinforce it. Add additional leaves underneath.
5. Flower 3
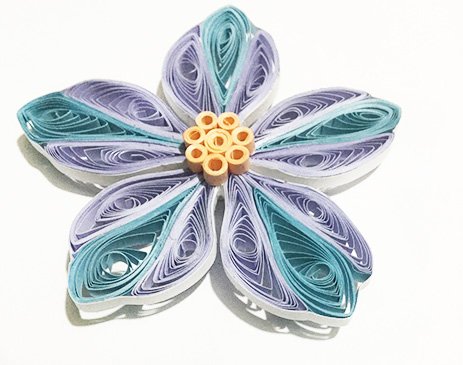
- Create 10 crescent shapes of one color and 5 teardrops of another color.
- Place 1 teardrop between 2 crescents facing inward.
- Apply Tombow Mono Aqua Liquid Glue to the sides of the teardrop shape and adhere a crescent to each side.
- Don’t forget to reinforce these combination petals by wrapping them with another strip.
- For the center, cut strips into ⅛ sections.
- Roll each strip into 6 or 7 tight coils.
- Create 1 tight coil for under the flower.
6. Assemble
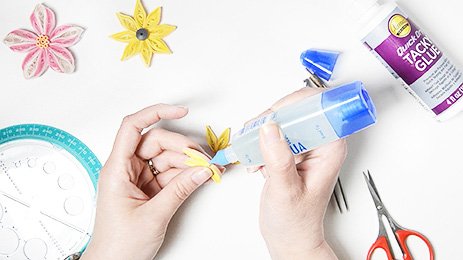
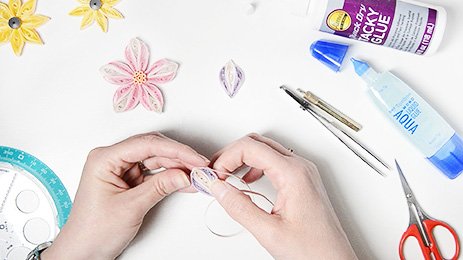
- Arrange the petals of each flower type around a central point. Apply Tombow glue to the inner petal tips and partial sides where the arranged pieces connect. Press and hold petals together for a couple of seconds before moving to the next piece. Continue gluing the petals together and finalize the arrangement before allowing the pieces to dry completely.
- Use the tweezers to apply pressure to the connecting pieces as needed.
- Apply Aleene’s glue to the flower’s center pieces. The tacky glue helps to strengthen the adjoining petals. For a pop-up piece, attach an additional tight coil underneath the flower’s center with the Aleene’s glue.
7. Curl & Swirl

- Cut 3-5 strips in half.
- Use the Tombow glue to adhere the strips together at one end only. To reduce bulkiness, glue each strip slightly lower than the strip before it to create a tiered or cascading arrangement.
- Wrap the connected side around the width of the quilling tool instead of inside the quilling tip.
- Allow the curl to uncoil partially.

- Pull on each of the strips on the unglued side to adjust the distance between each strip inside the coil.
- When the desired arrangement is reached, trim the remaining edges of the unglued side and secure the end with glue.
- Add teardrop-shaped leaves as desired.
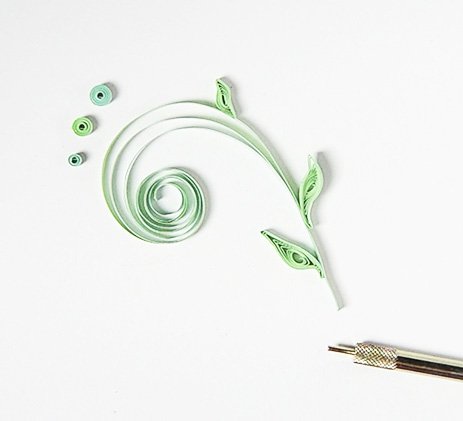
8. Stem with Leaves
- Cut strips into a set of sizes such as full, ¾, ½, ¼, and ⅛.
- Create pairs of teardrop shapes.
- Use the Tombow glue to secure the leaf at the tip by wrapping the central strip/stem around the top leaf once.
- Attach the remaining leaves in increasing pairs along the stem with Aleene’s glue.
Build a Butterfly
9. Framing the Wings
- Layer 5 strips in cascading/tiered level arrangement and glue on one end.
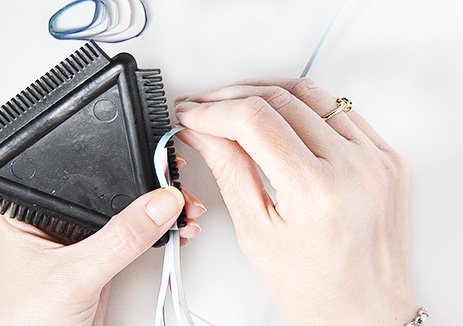
- Place the glued end inside the Faux Finishing Comb between the 7th tine (or prong) and fold it down.
- Apply the Tombow glue along the front folded piece only (no glue should be applied to the back side).
- Separate the top strip from under the comb and wrap it up and over the area. Slide it between the next highest prong of the comb.
- Apply Tombow glue 2/3 of the way up the strip on the front side of the comb. Do not glue the entire length as these pieces will be spread out later.
- Wrap the next strip in line up, over, and through the next prong of the comb. Repeat.
- On the last two strips, we increased the spacing by skipping 1 tine/prong.
- On the final strip, apply glue to the whole front side and wrap up and through the same tine as the previous strip.
- Trim the strips in a cascading fashion to avoid a bulky ending. Apply glue to one strip at a time and wrap each to finish the form.
- Remove the wing from the comb and adjust the shape to form the top portion of the butterfly wing.
- When the desired shape is achieved, use Tombow glue and wrap the outer edge of the wing with a final black strip to add strength.
- Repeat the above steps 3 more times to create 2 tops and 2 bottoms.
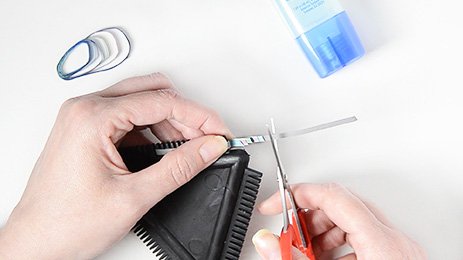
10. Add Iridescent Flair
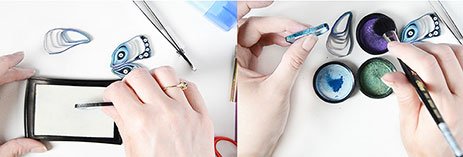
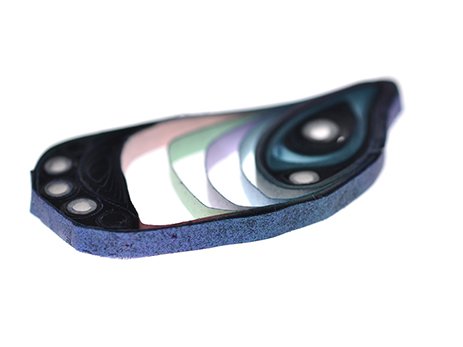
- Dip the edges of the wings into the VersaMark Stamp Pad.
- Use the mop brush to dust Pearl Ex Pigments along the edges of the wings.
- Place the glued end inside the Faux Finishing Comb between the 7th tine (or prong) and fold it down.
- Apply the Tombow glue along the front folded piece only (no glue should be applied to the back side).
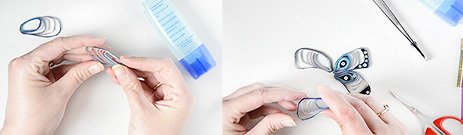
11. Embellish the Wings
- Use tight coils, teardrops, marquise, and crescent shapes to add desired embellishments inside the strips of the butterfly wings.
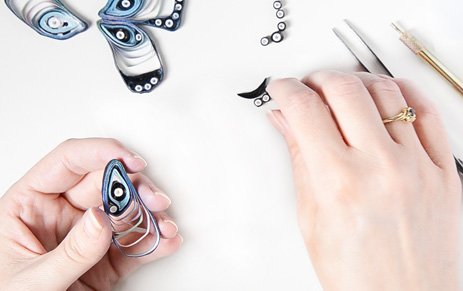
- To create the black and white coils, cut ⅛ black strips and ⅟₁₆ white strips and pre-attach them with Tombow glue to form a two-colored strip. Then roll a tight coil. Use Aleene's glue to create a thin layer of glue on the back of the wing to secure the small pieces in place.
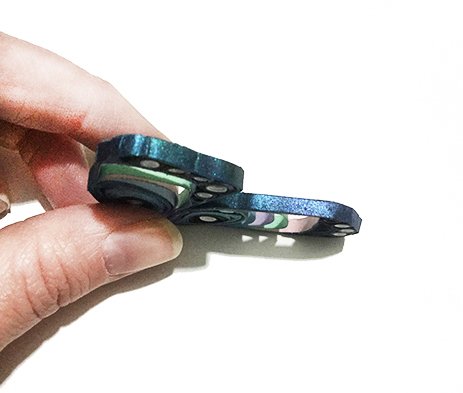
12. Join the Wings
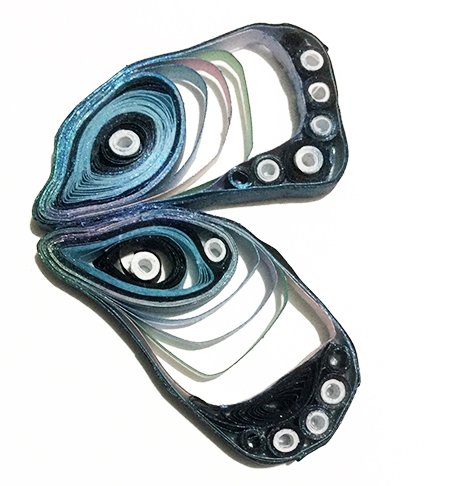
- After adding any interior embellishments, use the Aleene’s glue to join a top and a bottom frame of the wings. The tweezers may be used and locked in place to hold the top and bottom together while the glue sets. Optionally add more Pearl Ex Pigments as desired either with the VersaMark Stamp Pad or a touch of Tombow glue.
13. Forming the Body
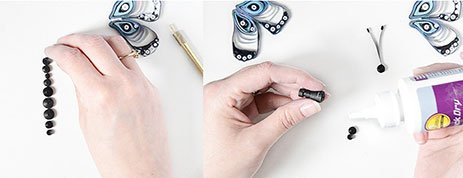
- Roll 3 tight coils with full length black strips, 1 tight coil with a ¾ length strip, 3 tight coils with ½ length strips, and 2 tight coils with ¼ length strips.
- Use Aleene’s glue to stack and attach the coils in this order: ½, ¼, ½, ¾, full, full, ½, and ¼.
- Fold a ½ length strip to make a V shape.
14. Create Antennae
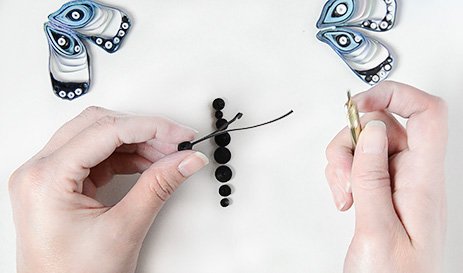
- Use the quilling tool to curl each end of the V down towards the center about ½ way. Flatten the curled ends and glue them to the strip with the Tombow glue.
- Roll a ½ length tight coil.
- Add Tombow glue around the tight coil and place it at the center of the V. Use the V to fully wrap around the coiled head and add glue to hold the antennae together at the top of the head.
- Attach the head to the body with the Aleene’s glue.
15. Build a Butterfly
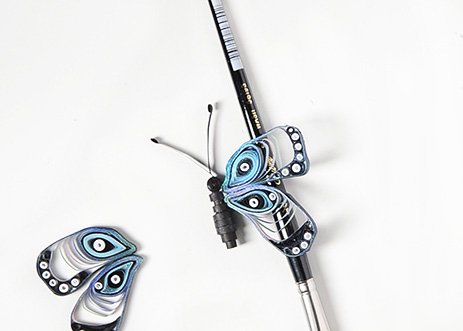
- Use the Aleene’s glue to attach each wing to the body. Use an ample amount and allow it at least 15 minutes to cure before handling and attaching the next wing. Use supply items to support the wing in place while it cures.
- Keep in mind the overall depth of the frame so that the wings will still fit inside the glass.
16. Arrange and Secure
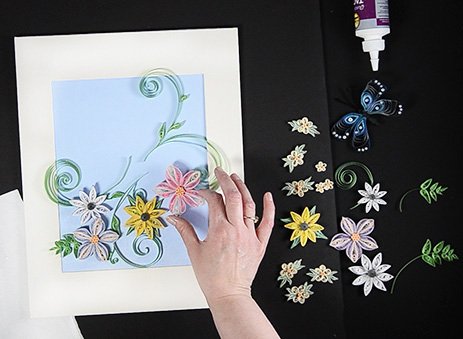
- Confirm the location of the hanging components on the backing board to verify they are facing the right direction for either a landscape or portrait orientation based on your design. Avoid being left with hanging your artwork upside down.
- Glue the mat onto the painted backing board with Aleene’s glue.
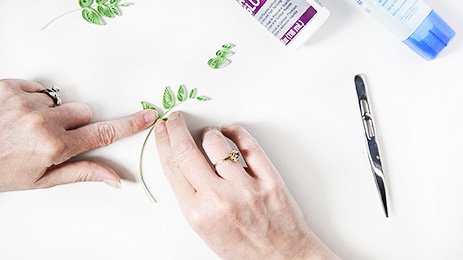
- Arrange the floral pieces into a desired composition.
- Lift away small sections at a time and secure them by gluing each overlapping layer from back to front.
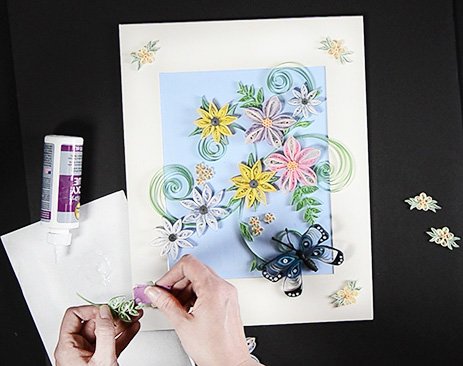
- Apply Aleene’s glue to adhere each piece into position.
- Options for glue application include applying with a Q-tip or folded scrap of paper (we folded a sticky note), gently dipping pieces into a shallow puddle of glue, or applying small amounts directly with the glue bottle tip.
- We suggest applying glue to the pieces instead of the backing board to avoid over-gluing. While it dries clear, unnecessary glue may create an unwanted visible sheen around the pieces.
17. Installation
- Allow the glue time to dry.
- Turn the frame with the glass face down.
- Insert the frame’s spacing piece behind the glass. Carefully place the backing board into the frame and close the hinge points.
- Hang and enjoy!
More Project Sheets

Glow-in-the-Dark Mirror
- Difficulty Level: Beginner-Intermediate
- Completion Time: 2 Hours

Tools Silhouette Sign for Dad
- Difficulty Level: Beginner-Intermediate
- Completion Time: 1-2 Days

DIY Acrylic Pour Bracelet
- Difficulty Level: Beginner
- Completion Time: 2-3 Days

DIY Mason Jar Planter
- Difficulty Level: Advanced
- Completion Time: 2-3 Days

Marbled Ornament
- Difficulty Level: Beginner
- Completion Time: 1-2 hours

Clay Pumpkin Jar
- Difficulty Level: Beginner
- Completion Time: 1-2 hours

Pro Glow Tape Skull
- Difficulty Level: Beginner
- Completion Time: 1 hour

Personalized Pencil Pouch
- Difficulty Level: Beginner
- Completion Time: 1 hour (plus drying time)

Decorate Your Own Birdhouse
- Difficulty Level: Beginner
- Completion Time: 2-4 hours

Transparent Photo with High Gloss
- Difficulty Level: Beginner
- Completion Time: 1.5 hours

Sketching with Graphite Putty
- Difficulty Level: Beginner
- Completion Time: 8 hours

Scratch Art with Color Accents
- Difficulty Level: Beginner/Intermediate
- Completion Time: 1-3 hours

Polymer Clay Fairy House
- Difficulty Level: Intermediate
- Completion Time: ~8 hours

Experiment with Resin Casting
- Difficulty Level: Beginner/Intermediate
- Completion Time: 1-2 hours (pre-cure)

Color-Splash Vision Board
- Difficulty Level: Beginner
- Completion Time: 3-4 hours

Etched Glass Holiday Gift Jar
- Difficulty Level: Beginner/Intermediate
- Completion Time: 1 hour

Create a colorful reminder of the good things in life
- Difficulty Level: Beginner/Intermediate
- Completion Time: 1 hour

Face Painting with Custom Stencils
- Difficulty Level: Beginner/Intermediate
- Completion Time: 1 hour

Art Deco Pendant with Polymer Clay
- Difficulty Level: Beginner
- Completion Time: 1 hour

Transfer Designs with Lazertran
- Difficulty Level: Beginner
- Completion Time: 15-20 minutes

Multimedia Painting with PanPastels
- Difficulty Level: Beginner/Intermediate
- Completion Time: 1-2 hours

Special Effects with Brusho Colors
- Difficulty Level: Beginner/Intermediate
- Completion Time: 1-2 hours

Make Your Own Paper Quilling Frame
- Difficulty Level: Beginner/Intermediate
- Completion Time: 10 hours

Make Your Own Greeting Cards
- Difficulty Level: Beginner
- Completion Time: 10-30 Minutes

Make Your Own Autumn Leaves Stained-Glass
- Difficulty Level: Beginner/Intermediate
- Completion Time: 1-2 hours

Make Your Own Magnetic Alien Message Board
- Difficulty Level: Beginner
- Completion Time: 2 hours

Make Your Own Compact Disc Drink Coasters
- Difficulty Level: Beginner
- Completion Time: 2 hours

Make Your Own Crayon Candles
- Difficulty Level: Intermediate
- Completion Time: 4 hours

Make Your Own Kite
- Difficulty Level: Intermediate
- Completion Time: 3 hours

Make Your Own Masquerade Ball Masks
- Difficulty Level: Intermediate
- Completion Time: 2.5 hours

Make Your Own Multimedia Greeting Card
- Difficulty Level: Intermediate
- Completion Time: 2 hours

Make Your Own Bouquet of Photo Flowers
- Difficulty Level: Beginner
- Completion Time: 1 hours

Make Your Own Rock Zoo
- Difficulty Level: Beginner
- Completion Time: 2 hours

Make You Own Custom Sketchbook
- Difficulty Level: Intermediate
- Completion Time: 2 hours

Make Your Own Stained Glass Window
- Difficulty Level: Beginner
- Completion Time: 2 hours

Make Your Own Oil Painting T-Shirt
- Difficulty Level: Intermediate
- Completion Time: 24 hours

Make Your Own Paper Mache Bowl
- Difficulty Level: Intermediate
- Completion Time: 24 hours